
Authentication, sessions, cookies, OAuth 2.0, Authorization Code Flow … how to make sense of the complexity.
The modern system
In the early days, we wrote a single application that did it all. The gorgeous monolith! It did everything: handled user requests, authenticated users, rendered UIs, queried data directly from the database, served files, managed user sessions … everything. This could have been an application built with Rails, Spring, Node.js, but that’s no longer a representation of a “modern system”.
We now live in a world where “monolith” is a bad word. Everything has been split out into microservices, SPAs (Single-Page web App), PWAs (Progressive Web App), native mobile apps, with other functionality delegated to a FaaS, PaaS or SaaS (Functions, Platform or Software as a Service). This has given us a greater sense of organization and tooling to focus on solving the unique, novel problems independently of the common ones. Experts can now be responsible for their relative domains within their own repository or project. If a company does not employ an expert of a required domain, it can now “outsource” it to be managed by another company.
Unfortunately, this new paradigm doesn’t come without its own set problems. Architecture diagrams now illustrate a complex web of distributed components that are simple in isolation, but hard to reason about when viewed holistically. Due to this distributed nature, the system now comes with more surface area to protect from unwanted access. In a world where everything is a tap or click-of-the-finger away, it’s more important than ever to ensure the right fingers have access to the right data.
With that said, knowing the basics of a protected system is no longer optional. Developers, product managers, IT professionals, we all need to have a good grasp of the fundamentals, so let’s cover the basics to ensure we keep our data convenient but private and our users happy but safe.
What is a protected system?
In most modern, enterprise cases, “the system” will consist of a diverse collection of entities, but let’s start with the most simple use case, the monolith (not quite a “system”, but bear with me):
- A single, server-side application
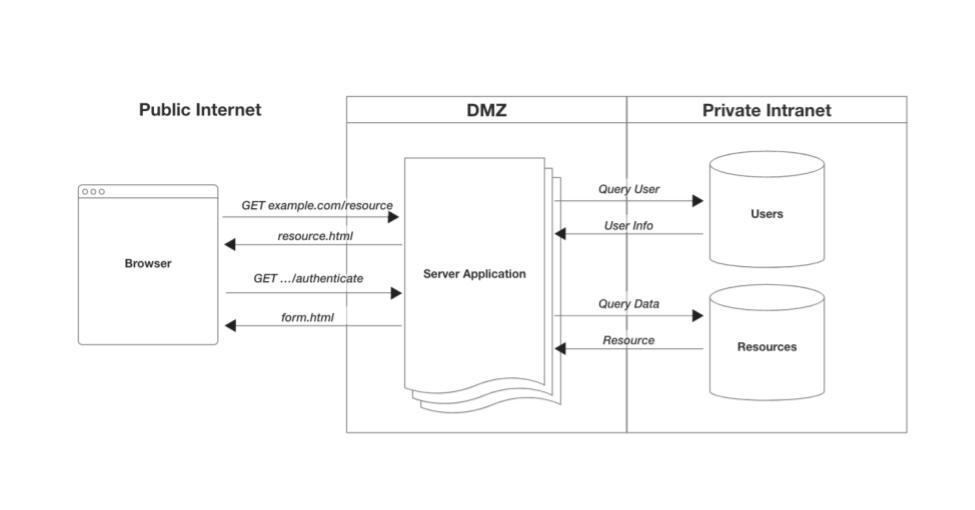
This single application was responsible for everything, including identity and access management. These were applications common around the turn of the century. Though these “systems” still exist, they are becoming much less common as they are very hard to manage and engineer at large scale.
To take some baby steps, let’s consider one step up from this monolith and separate out access management from the monolith.

In this design, you have two entities:
- An application managing the resources you want protected (eg: private data, protected documents, images, videos, etc)
- An application managing all access concerns (user management, multi-factor authentication, session management, authorization, token expiration, etc)
The beauty of this system is how it scales. As you add more protected applications to the system, you just delegate access related needs to the access management application (there are other great benefits to this, but let’s save that for another article). The new applications introduced to the system could be Web apps, mobile apps, REST API service apps, GraphQL apps … anything that potentially serves up a protected resource. In an effort to avoid having to rebuild such a vital function over and over with each new app, you “connect them” to your access management app. This dramatically reduces the surface area of risk in complex systems.
What’s more, this serves the users better. It means they login once and have access to everything their role or privileges allow. Sounds good, yeah? Let’s now go a bit further.
What’s a common system design?
In modern system architectures, it’s quite common to have multiple, client-side apps, for example: iOS, Android, Web. In these situations, it’s advantageous to extract all data related concerns from our protected app into a centralized API server (or servers), often referred to as “services”. Each client app then requests data via API (usually HTTP). This prevents business logic duplication across multiple applications and simplifies client-side development.
Let’s add this API server as an entity to our system from above. We now have three distinct entity types as our “protected app” has been split:
- Protected client-side apps
- Protected resource API services
- Access management app
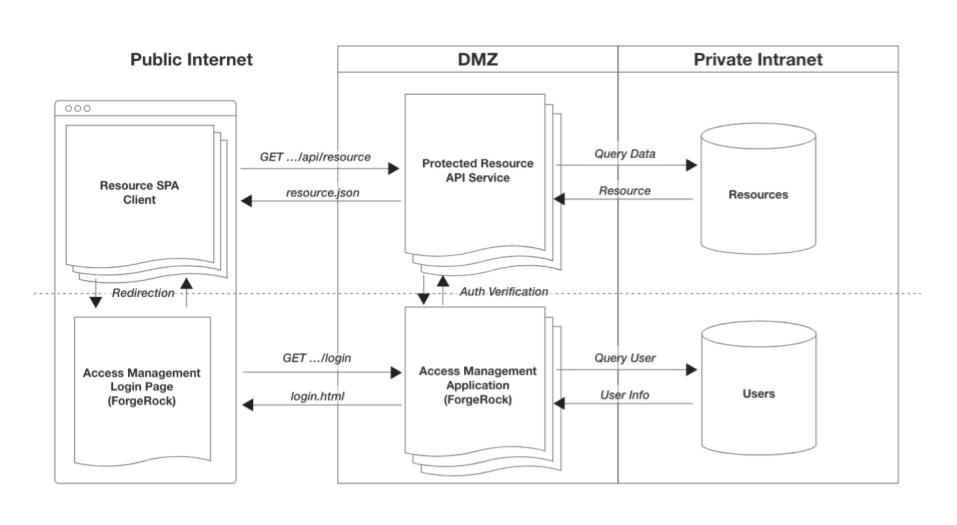
The main access related concern of the protected client apps and the API services is distinguishing authenticated users from unauthenticated ones. The end goal is ensuring those without access get denied and/or converted to users with access by directing them to the access management app.
Let’s break down the responsibility of each.
Client-side apps
The role of a protected client-side app is to not only distinguish between authenticated and unauthenticated users, but to assist in converting unauthenticated users into authenticated with as little friction as necessary.
The simplest protection is by route, page or view. An app will typically have both public and private portions. The protected portions will often have a reusable function that precedes the processing of the request that checks if the user has access (often referred to as “middleware”). This is done by sending the access artifact, like a session cookie, to the access management app for validation. If the validation succeeds, continue processing the request; if not, redirect the user to login.
This can be something as simple as this:
// Using Page.js middleware-style pattern (session-based example)
async function isAuthenticated(context, next) {
  const authResponse = await request(sessionValidateEndpoint);

  if (authResponse.valid) {
    next(); // continue with processing request
  } else {
    redirect(authenticationUrl); // send user to login
  }
}

routes('accounts/balances', isAuthenticated, (context) => {
  render(changePasswordForm);
});
NOTE: It’s important to know that protected client-side apps are not truly secure and should not have embedded within it protected resources, secrets or private keys. They are inherently vulnerable as the entire codebase is sent to the useragent (a device outside of our control) to be executed, so all code is subject to manipulation.
Even though this client-side application cannot guarantee access protection, the implementation of such protection on the client increases user-experience and performance, as well as reduces unnecessary requests to the underlying services.
Resource API services
The role of a protected resource API service is to be the final arbiter of protecting access to resources within the system. Since we can’t fully trust our client-side applications, our resource API will need to duplicate that same check for authentication.
It will use the authentication artifact sent from the client with every request to validate the access to the requested resource. If validation passes, process the request. If it fails, send a 401 error message, and let the client-side app appropriately handle the issue. Simple.
// Using Node.js middleware-style pattern (session-based example)
async function isAuthenticated(req, res, next) {
  const authResponse = await request(sessionValidateEndpoint);

  if (authResponse.valid) {
    next(); // continue with processing request
  } else {
    res.status(401).send(); // respond with 401 unauthorized
  }
}

routes.get('accounts/balances', isAuthenticated, (req, res) => {
  const balances = db.query('balances');

  res.json(balances);
});
NOTE: The above is route-level protection, which may not be granular enough for your system. Object-level protection, an increase in granularity, is outside of the scope of this article.
Access management application
This is an application that has the most important role in a protected system. It manages users, login flows, sessions, authorization, password management … all of which are vital functions. At the simplest level, here are the main touch points of the system:
- Handles the redirection from client-side apps for login flows, redirecting users back to the respective application upon completion
- Provides an API for session/artifact validation
- Provides an API for termination of session or artifact
In situations where the above responsibilities exceed a level of complexity, it’s often a good idea to delegate these responsibilities to a platform service provider, like ForgeRock. Our services and products allow you to focus on the novel aspects of your application development and delegate the complexities of identity management (users, things, devices, etc) and access management (what those identities can do) to us.
Let’s see how adopting ForgeRock for our access management changes our system.
Integrating ForgeRock into a protected system
ForgeRock provides a powerful, configurable Identity and Access Management solution out of the box. Whether it’s the Identity Cloud platform; self-hosted, cloud-ready container; or individual on-premise products, ForgeRock can provide a great solution for nearly any system. For simplicity, let’s go with the ForgeRock Identity Cloud solution (aka Identity Cloud) for the rest of this article.
Identity Cloud comes with its own login flow, registration and self-service flows as well as all the APIs needed for validation, refreshing, termination, authorization and more. This all-in-one solution works perfect for internal solutions or get-up-and-running quickly situations. But eventually, most companies want their user-facing flows to be fully customizable to suit their branding requirements.
“If I’m redirecting my users to ForgeRock’s platform, how do I provide a fully branded experience?”
Remember when I mentioned that your access management app, in this case ForgeRock’s Identity Cloud, is responsible for both rendering UIs and providing an API? Here’s where you leverage the latter to build your own UX for your login, self-service and registration flows.
Building a branded UX with Identity Cloud and the SDKs
A branded experience means that you will be moving the responsibility of rendering the user flows from Identity Cloud to an app that you will build. To facilitate this, we provide an SDK for native iOS and Android development as well as a JavaScript SDK for Web apps. This allows you to easily integrate the ForgeRock APIs into a new or existing app.
There are essentially two choices for how to proceed:
- Move the user flows into each protected app, providing a native UX
- Move the user flows into a single Web app to centralize the login experience
In both cases, our SDKs will help in developing these experiences. But, before we move on, it’s important to know that your overall system has a significant impact on what choice suits you best.
What’s your intended system design?
There are a few important points to consider when choosing how to protect your system:
- How many client-side apps will need protecting?
- Are all your apps and services served from a single domain?
- Will there be any third-party apps or services that will need protection?
Let’s dive into each concern and how it impacts your system.
How many client-side apps will need protecting?
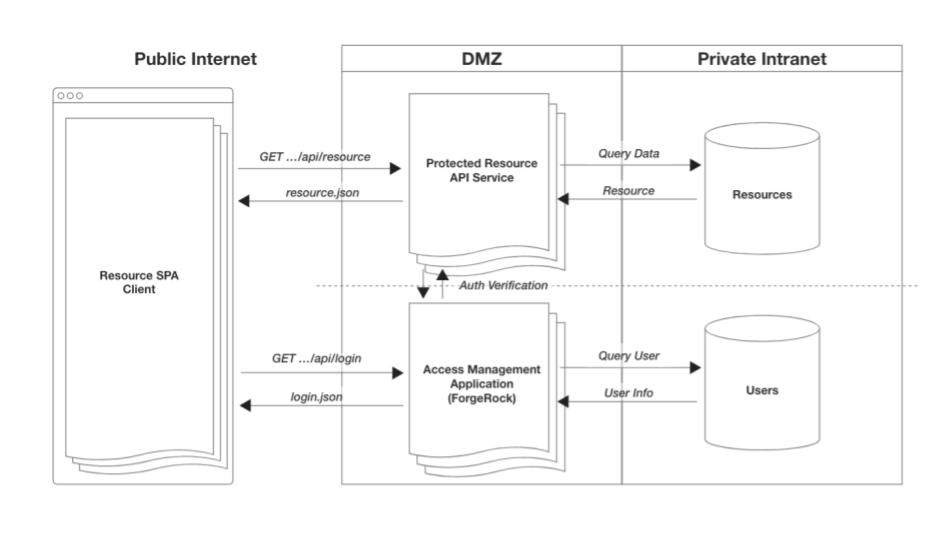
Let’s say you have one app for each major platform: a Web app, an iOS app and an Android app. With little future plans of increasing the number of apps dramatically, you may want to develop the user flows for login, registration, et cetera within each app. This ensures that each app has 100% control over the best user experience for that platform.
By using our SDKs for each respective platform, you can more efficiently develop a dynamically responsive UI handling each step within an authentication journey. This just slightly changes our client-side app’s responsibilities.
Rather than redirecting unauthenticated users away from our application, we now just internally route the user to our native login flows. But, we will still continue to validate the user’s session upon each navigation of our app.
“But, we have dozens/hundreds of client-side applications! We don’t have the resources to update all of them.”
Now, if you have many apps, and each app needs to have within it a login (not to mention registration) flow, that’s a lot of duplication. This will inevitably become a maintainability challenge and a security liability as it increases your attack surface. Within this context, we need to go one step further.
To deal with this challenge, it’s often recommended to extract the login (and possibly registration, self-service) related responsibilities out of the client-side apps and build a single Web app exclusively around this functionality. All front-end applications (mobile and Web) can now redirect to this one, centralized application. This reduces your surface area for security liabilities as well as reduces duplication across your system. Let’s take a look at our system now:
- Protected client-side apps (mobile & Web)
- Protected resource API services
- Authentication (login, registration & self-service) Web app
- ForgeRock Identity Cloud

With this design, we are now starting to organize the system components by scope of responsibility. For mobile applications, they’ll have the availability of using the browser to authenticate, being redirected back to the native app when complete. Web apps will just do a full redirect to the authentication app and a redirect back when done. Single sign-on functionality is provided out-of-the-box as the browser is the shared platform for authentication between all apps, native or otherwise, on the user’s device.
This provides a more scalable system that’s optimized with apps having a more focused set of responsibilities and giving you full control over your brand and UX. Now that we have the core system design out of the way, let’s discuss how all of these components will be hosted.
How are you hosting all these applications?
Simply put, are all of the applications in the above system running on the same host? For example:
mydomain.com/authmydomain.com/appmydomain.com/api
Another example would be the use of unique subdomains all on the same parent domain:
auth.mydomain.comapp.mydomain.comapi.mydomain.com
If using either of the two patterns, a session-based system may work well for you. Sessions are frequently based on browser cookies, which are fundamentally restricted by the host or parent domain.
On the other hand, you may be using different hosts across your apps:
auth-server.comweb-app.comrest-server.com
This will constrain your options as session-based auth (driven by cookies) will be a challenge with Web apps and multiple hosts (often referred to as third-party domains). An OAuth-based system is well designed for this particular environment as it uses Access Tokens and/or OpenID Connect tokens as the artifact passed around in the system, rather than a cookie.
But, before we dive into OAuth 2.0, and its extension OIDC, let’s discuss one more aspect of our system.
Will there be any third-party apps or services involved?
Do you have the need to extend access of your protected system to any third-party entities? For example, you may want an application of a consulting firm to interact with your protected, workforce system but restrict the scope of capabilities since they are technically outside of your company. For this, an OAuth-based system may be a better choice.
What’s OAuth and why is it better than session-based access with diverse hosting environments and third-party entities? Let’s differentiate these two models.
Let’s Talk About Access Models (Session v. OAuth)
To keep things simple, let’s focus on two of the most common models of access: session-based and OAuth-based. Your system design, discussed above, should strongly influence the type of access model you want to implement, but it’s not the only factor in making the choice.
Additional factors that can influence your access modeling are a bit more advanced and out of scope for this article, but they include:
- Transaction authorization (aka policy enforcement)
- Finer control over expiry times and access lifetimes
- Finer control over scope of access or privileges
Look out for more information about these factors in a future article. For the rest of this article, let’s talk a bit more about the basics of two foundational access models.
Session-based (cookies)
The session-based model traditionally uses the HTTP cookie as its artifact. It’s one of the oldest models for the Web as the cookie was invented around the mid 1990’s (though not originally for authentication). The HTTP cookie is a relatively simple way to persist data (a simple string of text) within a Web browser. This small piece of information is stored natively in the browser and is tightly bound to the domain of the HTTP request the browser made to the server.
Let’s use a simple example:
There’s Web app running on https://dashboard.example.com and an access management application running on https://auth.example.com. After making a request to the access management app to login, a “session cookie” gets added to my browser. This cookie is written because the server sent back a Set-Cookie header, so the cookie gets written to the domain of the server: auth.example.com.
Example of browser cookie storage:
-------------------- -------------------- --------------------
COOKIE NAME          VALUE                DOMAIN

session_id           AJi4QfFBCMzK3QFm…    .example.com
-------------------- -------------------- --------------------
Now that we have this cookie, all requests from that browser to example.com (even subdomains) will contain a cookie header with its value. It’s worth noting that this “Just Works” as it’s a seamless, almost invisible, mechanism of the browser.
Example of request with cookie:
GET https://auth.example.com/sessions/validate

HEADERS
content-type: application/json
cookie:       session_id=AJi4QfFBCMzK3QcIFm…
origin:       https://dashboard.example.com
This means you can have multiple apps running on multiple subdomains, and as long the same parent or root domain is used, this session cookie will be sent automatically
For example:
www.example.comaccounts.example.comprofile.example.comtasks.example.com
With servers running on:
auth.example.comdata.example.com
As long as all apps are running on the same parent domain (example.com), you can configure cookies to work with this setup. In this case, we would configure the cookie to be written to the parent domain, example.com for the highest amount of flexibility as your servers can then have subdomains and they will still receive the cookie (many browsers store this as .example.com).
The downside to this model is the tight coupling of cookies with their respective domains.
If you have apps running on different domains, say auth.example.com and data.userbase.com, this model starts breaking down. The cookies written by auth.example.com would not be sent to our data.userbase.com server. In this case, one is usually encouraged to look elsewhere for our access model, and this is where OAuth steps in.
It’s worth noting that there still exists a nuance with browser-based apps (SPA) running on a different domain entirely from the servers, and the cookies still work as usual. The caveat is that the server applications have to be on the same parent domain. Unfortunately, cookies written in this way will be deprecated within the next few years by most browsers (Safari has already disabled third-party cookies by default).
OAuth 2.0
OAuth is an industry standard for handling authorization and has been around since the late 2000’s. OAuth 2.0 is the most recent specification of the protocol and is a large rework from the original. In this writing, any reference to OAuth will always refer to the 2.0 specification.
OAuth is a complex specification and has many variations and nuances. The details of which are beyond the scope of this article, so we will be focusing only on the basics.
The core artifact of OAuth is the Access Token, and like the value stored in a cookie for sessions, it is frequently just a simple string of text (sometimes called a JWT). But, unlike the cookie, the browser does not have a native concept of an Access Token, so obtaining and managing an Access Token doesn’t automatically happen within a browser.
Note: There are other tokens frequently mentioned in texts about OAuth that are beyond the scope of this article. Refresh Tokens, often used for native applications, as well as the ID Token as part of the OpenID Connect spec used for identification. These tokens will not be covered in order to keep this article more introductory; it is not because they are unimportant.
There are some choices about how to store and send the Access Token within a system. For the Web, IndexedDB, localStorage, advanced use of iframes or Web Workers, or just an in-memory reference can be used to store the token. Access Tokens are also not automatically sent along with all HTTP requests, so how one bundles this token on HTTP requests is also something that needs to be considered. Luckily, as these decisions are hard to make, the industry has already standardized around the best practices.
“So, why is OAuth 2.0 better than session-based cookies in certain circumstances?”
The reason OAuth is often brought up in situations where you have third-party applications and services or a multi-host setup with varying domains is because of its granularity of permissions (for security/privacy), as well as complete decoupling from domains, servers or built-in functionality of the browser. Because of the fact that it’s up to you, you have more control over how it behaves. At the end of the day, an Access Token is just a generic opaque string that’s passed around the system, frequently called a “Bearer Token” and written to the Authorization header of requests.
Example of request with authorization header:
GET https://rest.resource.com/activity

HEADERS
content-type:  application/json
authorization: Bearer 3QcIFmU6r0q43U…
origin:        https://dashboard.example.com
Using OAuth doesn’t dramatically change your system design since the basic principles of how it is used doesn’t dramatically diverge from the session-based model. You are still obtaining an artifact from a server, validating the artifact when protected resources are accessed, and passing it from client to API.
For example, here are a few tweaks to the session-based example from above:
// Using Node.js middleware-style pattern (oauth-based example)
async function isAuthorized(req, res, next) {
  const authResponse = await request(oauthIntrospectionEndpoint);

  if (authResponse.access) {
    next(); // continue with processing request
  } else {
    res.redirect(authorizationUrl); // send to authorization
  }
}

routes.get('accounts/balances', isAuthorized, (req, res) => {
  res.render(changePasswordForm);
});
NOTE: It’s worth noting that validating Access Tokens can also be done without a network request to the access management server. We refer to these as “stateless” tokens, and they can be introspected with a JWT decoding library and validation is done to the encoded properties and signatures.
The only substantial difference between the OAuth and session-based model is the fact that an OAuth token does have to be specially obtained from your access management application. This process is often called an OAuth flow (the most common is a variant called the Authorization Code Flow). There are a few different variants to OAuth flows, but these too are beyond the scope of this article. This flow is done separately from the logging in process, or technically speaking, user authentication (In the session-based model, authentication and authorization are one-in-the-same).
The good thing is you don’t have to reinvent the wheel to implement OAuth. ForgeRock Identity Cloud is a great example of a provider of an entire platform and set of APIs to help facilitate authentication and authorization with OAuth.
“So, what’s the best design to protect my system?”
The answer is … well, it depends. As discussed above, there are quite a few important aspects to the kind of system we are discussing and the future plans for your products. Hopefully, after reading through the basics articulated above, you have a better, foundational understanding of what it means to design a protected system.